MySQL is Relational Database Management system which is free Open Source Software Under GNU License. It is also supported by Oracle Company .It is fast , scalable, easy to use database management System. MySQL support many operation system like Windows, Linux, MacOS etc.
MySQL is Structured Query Language which is used to manipulate, manage and retrieve data with the help of various Queries.
MySQL is developed and supported by MySQL AB which is a Swedish Company and written in C and C++ programming language. It was developed by Michael Widenius and David Hughes .It is often used to say that MySQL is named after the name of daughter of the co-founder MIchael Widenius whose name is ‘My’.
Architecture of MySQL:
Architecture of MySQL describes the relation among the different components of MySQL System. MySQL follow Client-Server Architecture. It is designed so that end user that is Clients can access the resources from Computer that is server using various networking services. The Architecture of MySQL contain following major layer’s :
- Client
- Server
- Storage Layer
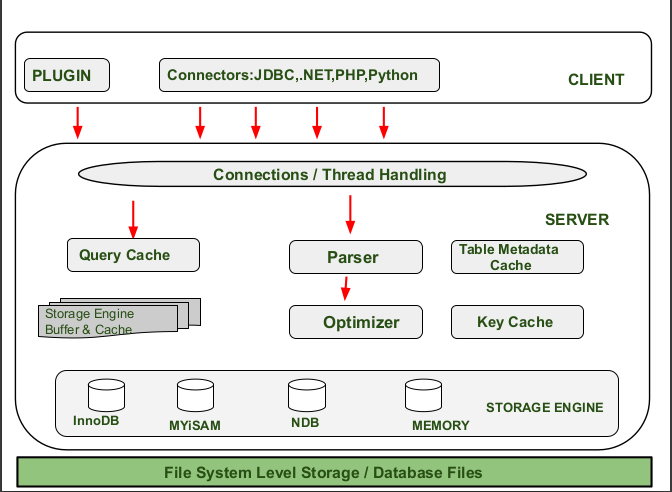
Client Layer:
This layer is the topmost layer in the above diagram. The Client give request instructions to the Serve with the help of Client Layer .The Client make request through Command Prompt or through GUI screen by using valid MySQL commands and expressions .If the Expressions and commands are valid then the output is obtained on the screen. Some important services of client layer are :
- Connection Handling.
- Authentication.
- Security.
Connection Handling :
When a client send request to the server and server will accept the request and the client is connected .. When Client is connected to the server at that time , a client get it’s own thread for it’s connection. With the help of this thread all the queries from client side is executed.
Authentication :
Authentication is performed on the server side when client is connected to the MySQL server. Authentication is done with the help of username and password.
Security :
After authentication when the client gets connected successfully to MySQL server, the server will check that a particular client has the privileges to issue in certain queries against MySQL server.
Server Layer:
The second layer of MySQL architecture is responsible for all logical functionalities of relational database management system of MySQL. This Layer of MySQL System is also known as “Brain of MySQL Architecture”. When the Client give request instructions to the Server and the server gives the output as soon as the the instruction is matched. The various sub components of MySQL server are:
- Thread Handling –
When a client send request to the server and server will accept the request and the client is connected .. When Client is connected to the server at that time , a client get it’s own thread for it’s connection. This thread is provided by thread handling of Server Layer. Also the queries of client side which is executed by the thread is also handled by Thread Handling module.
- Parser –
A Parser is a type of Software Component that built a data structure(parse tree) of given input . Before parsing lexical analysis is done i.e. input is broken into number of tokens . After the data is available in the smaller elements parser perform Syntax Analysis , Semantics Analysis after that parse tree is generated as output.
- Optimizer –
As soon as the parsing is done , various types of optimization techniques are applied at Optimizer Block. These techniques may include rewriting the query, order of scanning of tables and choosing the right indexes to use etc.
- Query Cache –
Query Cache stores the complete result set for inputted query statement. Eve before Parsing , MySQL Server consult query cache . When client write a query , if the query written by client is identical in the cache then the server simply skip the parsing, optimization and even execution, it just simply display the output from the cache.
- Buffer and Cache –
Cache and will buffer store the previous query or problem asked by user. When User write a query then it firstly goes to Query Cache then query cache will check that the same query or problem is available in the cache. If the same query is available then it will provide output without interfering Parser, Optimizer.
- Table Metadata Cache –
The metadata cache is a reserved area of memory used for tracking information on databases, indexes, or objects. The greater the number of open databases, indexes, or objects, the larger the metadata cache size.
- Key Cache –
A key cache is an index entry that uniquely identifies an object in a cache. By default, edge servers cache content based on the entire resource path and a query string.
Storage Layer:
This Storage Engine Layer of MySQL Architecture make it’s unique and most preferable for developer’s . Due to this Layer MySQL layer is counted as the mostly used RDBMS and is widely used. In MySQL server , for different situations and requirement’s different types of storage engines are used which are InnoDB ,MyISAM , NDB ,Memory etc. These storage engines are used as pluggable storage enginer where tables created by user are plugged with them.
Features of MySQL:
- MySQL language is easy to use as compared to other programming language like C,C++, Java etc. By learning with some basic command we can work , create and interact with Database.
- MySQL consist of Data Security layer which protect the data from violator. Also, passwords are encrypted in MySQL.
- MySQL follow Client-Server Architecture where Client request Commands and instructions and Server will produce output as soon as the instruction is matched.
- MySQL is free to use under Community version of it. So we can download it from MySQL website and work on it freely.
- MySQL use multithreading which makes it Scalable. It can handle any amount of data .The default file size limit is 4 GB, but we can increase it according to our need.
- MySQL is considered as one of the fast database. It’s fastness is determined on the basis of large number of benchmark tests.
- MySQL is very flexible because it supports large number of embedded systems.
- MySQL is compatible to run on various operating system such as Windows, MacOS , Linux etc.
- MySQL allow transactions to be rolled back, commit and cash recovery.
- It has low memory leakage problem which increase its memory efficiency.
- MySQL version 8.0 provide dual password support , one is a current password and another is secondary password. With the help of this we can create new password.
- MySQL provide feature of Partitioning which improve performance of large databases.
Attention reader! Don’t stop learning now. Get hold of all the important CS Theory concepts for SDE interviews with the CS Theory Course at a student-friendly price and become industry ready.
Reference
architecture-of-MySQL